0 Comments

At work, we are still doing Cloud Service for our Azure solution which requires the Compute Emulator.


I was helping my co-worker to test his upgrade to Azure SDK 2.9 so we could move on to Visual Studio 2015. At the time, our solution was running on Azure SDK 2.6 and so I installed Azure SDK 2.9 for Visual Studio 2015 and ran the upgraded version of our solution on my machine. It ran just fine but since we wanted to make sure that this is properly tested, we didn't want to commit to using Azure SDK 2.9 yet.  Until such point in time, we actually wanted the main development to still use Azure SDK 2.6.  This itself is fine since we specifically created an Azure SDK 2.9 Upgrade branch so the affected source code is isolated to that specific branch and the rest are still on 2.6 SDK.  This is all well and good until...


When I tried to go back to my own feature branch that is still on Azure SDK 2.6 and started the debugging session, the Azure Compute Emulator did not work any longer.  It kept throwing the following "Error: The installed Microsoft Azure Compute Emulator does not support the role binaries." and suggested that I upgrade my solution to Azure SDK 2.9 which I certainly do not want to do until our test is completed and passing.


I am now in a bind.  I can't run and debug my own feature branch due to this problem.  Apparently the emulator does not support side-by-side installation and itself has been upgraded to version 2.9 and Emulator 2.9 just don't like 2.6 projects.  Sigh.


After looking around the web for the answer and finding none, I got to thinking that there are about 2 options that I could do to fix this...

Option 1.  Use System Restore to go back to a previous state when the SDK 2.9 bits are not yet installed... Unfortunately, the installation didn't create a System Restore point and I didn't do it manually either... so there goes that option.


Option 2.  Somehow reinstall Azure Compute Emulator 2.6 and force it to overwrite the current 2.9 Emulator.  This seems to be my only option now...
So, from previously spelunking attempts, I know the Azure SDK bits is located in "%PROGRAMFILES%\Microsoft SDKs\Azure\Emulator".  If my hunch is correct, the bits should be installed here.  So, what if I try downloading the 2.6 Compute Emulator installation bit from https://azure.microsoft.com/en-us/downloads/archive-net-downloads? Clicking the Azure SDK for .NET version under April 2015 (version 2.6) link which took me to: https://go.microsoft.com/fwlink/?linkid=534218&clcid=0x409. Clicking the big red Download button showed me a bunch of bits which include the MicrosoftAzureComputeEmulator-x64.exe which is exactly what I needed.   After downloading the program, I tried running it and got stopped in the middle of installation since a newer version of the emulator is already installed... So, now what do I do?


Well, I tried running that exe using /? options and lo and behold, there is an /uninstall parameter that I can use to uninstall... So, what if I download the 2.9 Compute Emulator installation program and run it with that parameter from Command Prompt... and... Voilà!! All the bits now got removed from inside the "%PROGRAMFILES%\Microsoft SDKs\Azure\Emulator" directory.  Great... so now I tried reinstalling the 2.6 Computer Emulator bit using the 2.6 installation bit... and... it got installed just fine. 


The final step was to try running my 2.6 solution back from Visual Studio and... YAY, it ran just fine.  Problem solved.


I hope this is useful for other people that also run into this issue.  Like I mentioned, I couldn't find anywhere on the web that explains this.

Enjoy.

0 Comments

From time to time, and for whatever reason…. like oh…say… your solution contains multiple projects and you decided to upgrade the cloud service project to the latest Azure SDK from version x and for whatever reason you have a reference to a specific Azure SDK component in one or more projects that are not your Web / Worker Role project… Guess what… you might run into this (Role perma-recycling fun)  after deploying to Azure that when tested on the development fabric it is working just fine.

perma_recycling

*Digressing*

You know what, sometimes Azure baffles me.  I upgraded my Azure SDK previously and managed to deploy it to the cloud and have it running just fine on one deployment and then when doing another deployment some time after it just refuses to start and start the recycling crap… and this is not a staging slot swap to prod slot thing, it’s direct deployment onto the production slot too.  I haven’t deep dive into Azure internal to understand what’s going on when you do deployment, but I think there are optimization steps (to make the deployment process faster perhaps) where sometimes the same VM is being used and when previously it still have the residual DLLs from previous deployment and when this happens, everything work just fine even after the SDK update and you forgot to update the outdated DLL… and sometimes, Azure just says, “… meh… screw you… I’ll drop your bit on a totally new VM and  guess what, HAHA!!, the bits that you think will be there is no longer there, so there…” and the recycling crap happens.

Is this what happened? I don’t know… maybe.  Some insights into this perhaps or not… http://blog.smarx.com/posts/what-happens-when-you-deploy-on-windows-azure.  Step 2 is a bit ambiguous…  Maybe Azure Friday will invite someone to explain how this thing works internally? *Nudge nudge wink wink*

*More digression*

You know what… this reminds me of something else… Sometimes when my Continuous Deployment build got processed by Visual Studio Online, I get this annoying Cannot copied such and such blah error during the build and the build crapped and stopped there. FAIL!  And the only thing I need to do is re-queue the build and guess what… It successfully build and deploy…

What the !(*&$&!#!!!  My theory… there is a build agent machine that is not configured right… and I was just unlucky to get sent to that agent from time to time.

*End of more digression*

Geez… what is this… Digression Inception?

*End Digression*

If you are a newb at Azure like I was previously, you’ll be scratching your head for a looong looong time trying to figure out what the heck is going on… 
It worked on my machine… Damn it..
*pull hair* … oh no *bald spot forming*.

After running into this issue a couple of time and doing searches for answers on stack overflow and what not… You’ll finally realize that you have missing reference and the web / worker role just can’t start your application because of that, which I think is the most likely candidate anyhow…

So, how do you go about troubleshooting this?

Remote Desktop is Your Friend

One easy way to do this is via Remote Desktop.

You DID configure remote desktop on that role, did you not…?

No?  You dummy you, go do it now!

… … …

You DO know how to configure remote desktop for your role, do you not?
No? *sigh*  Read this.
I’d recommend creating your own client certificate to use for this and CHECK IT INTO YOUR SOURCE REPOSITORY.  You never know when you need the certificate again… for example, when you need to redeploy the cloud service to a different Azure subscription and the original certificate is now nowhere to be found for reasons like the original developer who created the certificate on his / her machine left the company, the machine got wiped and YAY… no more certificate copy anywhere…  Happened… True story.

So, now that’s out of the way, go launch remote desktop and login…

What? You don’t remember what’s the password for the VM? Are you kidding me? *sigh*

Go read this and follow the instruction on how to reconfigure…

Event Viewer is Also Your Friend

Okay… now that you are logged into the remote desktop, go start Event Viewer.  If you don’t know how to do this, go quit and sell ice cream in a truck… or ask your boss to hire a DevOps... or go learn how to do it!!  Google or Bing maybe… like “How to launch Event Viewer from Windows Server 2012 R2?”…

Got Event Viewer up?  Good.

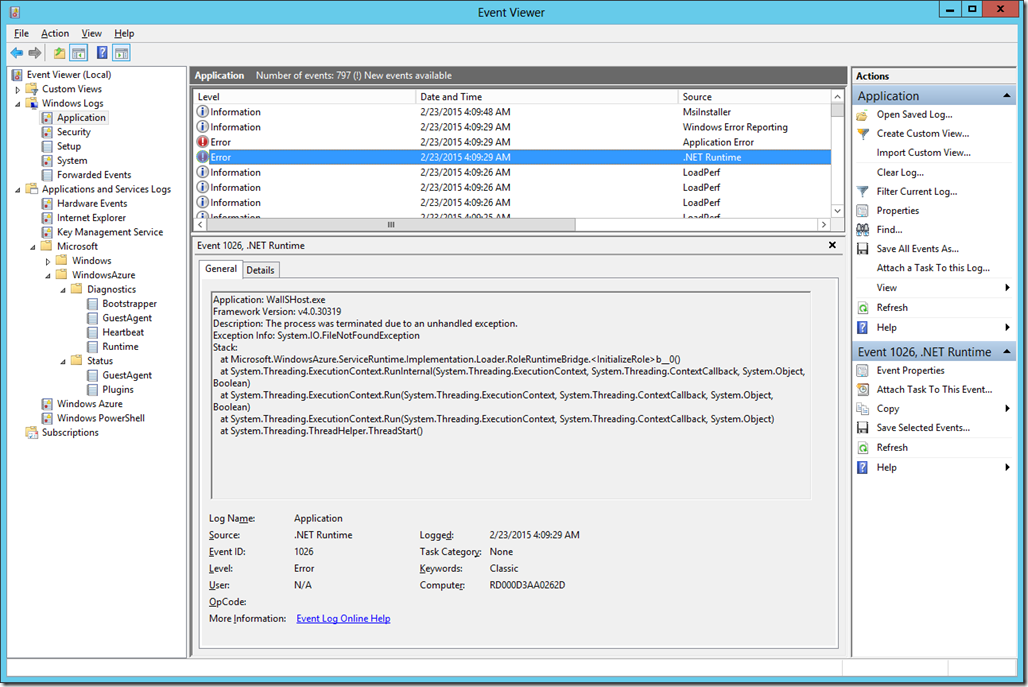
Now go open the Windows Logs node and drill into the Application node and find some errors (such as one that is shown below…)

EventViewer1

AHA! See that FileNotFoundException!!! I knew it, File Not Found…. It’s the same thing that is shown in the Azure portal.

Yeah…. but… what file?…. Uhm….
What a freaking useless error message.

Okay… maybe we are looking at the wrong place…. Let’s see what else is there…

Let’s try the Applications and Services Logs node… drill drill, aha… Windows Azure/Diagnostics/Bootstrapper node… It’s related to starting up the role right?  Bootstrapping = start up, right? Must be here..

AHA! I see some errors.

EventViewer2

… WT #(@$! CRuntimeClient: OnRoleStatusCallback #(*@#(*@#(*$  What the heck does that mean?

Yet more useless crap!

*sigh*  Oh well, let’s continue mining…

Applications and Services Logs/Windows Azure… WELL… what do you know… More errors… and this time.. we found GOLD… well, sort of…!

EventViewer3

Could not load file or assembly ‘Microsoft.WindowsAzure.ServiceRuntime, Version=2.3.0.0…’ at XXXXXXX.Shared.Configuration….

Now we are going somewhere…

What’s Next?

Well, now that you know what it can’t find during the startup, you just need to ensure that the DLL or whatever component the role needs to start is correctly packaged and deployed to Azure.  Upgrade the DLL using Nuget and fix your references, and make sure to set the missing reference to be copied always to the bin folder.

Check in your changes, trigger your Continuous Delivery build or package it and redeploy manually.  Whatever your deployment style is… Hopefully it will work this time… 

If it doesn’t…,
Well, go figure it out. Gave you a clue on how to troubleshoot this… Do I have to hold you hand through all the process? What are you? Kindergarten student? PHAW!

0 Comments

What I think how the Azure .Net SDK upgrade tool works behind the scene

I am not sure if this a 100 % correct, but from the observed behavior at work, upgrading Azure SDK (say from 1.8 to 2.2., or from 2.2 to 2.3, etc.) using the tooling that is integrated into Visual Studio seems to only update the references that belongs to projects that are referenced in the Azure Cloud Service project being upgraded.  Any other Azure DLL references elsewhere in your solution, WILL NOT be updated automatically.

For example, your solution looks like so:

Solution A (created using SDK 2.2)

  • Cloud Service Project
    • Web Project 1
    • Web Project 2
  • Cloud Library Component (has Azure DLL references i.e. Storage, ServiceRuntime)
  • Data Access / Repository Component (has Azure DLL references i.e. Storage, Cache)
  • Web Project 1 (has Azure DLL references i.e. ServiceRuntime, Configuration, Diagnostics)
  • Web Project 2 (has Azure DLL references i.e. ServiceRuntime, Configuration, Diagnostics, Cache)

I know… this is probably not how it should be done, but for the sake argument, this is brown field project that you inherited and tasked to upgrade to the newer and shinier Azure SDK.  Ideally, it would be nice if you can centralized the changes to a single project, but in reality, all sort of weird legacy things happen…

Given the solution structure, what we think Azure upgrade tool does under the cover is something like:

  1. Figure out what projects are references in the Cloud Service Project.  in this case it’s Web Project 1 and Web Project 2.
  2. Update all .cscfg and .csdef file to use the new SDK schema, etc.
  3. For all the projects found in the Cloud Service Project, look at all Azure DLL references in the project reference, and update it to point to the new SDK dll (i.e. in C:\Program Files\Microsoft SDKs\Windows Azure\.NET SDK\v2.3\ref).  Look as well in the respective web.config (maybe in app.config as well, not sure) and update and reference to the new Azure SDK dll.

To save cost, we use this trick where we have a webrole.cs inside our web project that is sort of doing what additional separate worker roles might do and this will need its own app.config inside the web project in addition to web.config since the webrole.cs will not run in the same application domain  / process as the web application itself and therefore will not get its configuration from web.config.  Rather, it will pull its configuration from the app.config in that same web project.  What we found is that the app.config is not being updated by the Azure .Net SDK upgrade tool.

In this case, only Web Project 1 and Web Project 2 Azure dll references are updated.  The Cloud Library and Data Access components ARE NOT updated even though they might be referred to by Web Project 1 / 2.


Azure .Net SDK upgrade choices

Given the situation, you can choose to:

  1. Spend the needed time to refactor the solution and try to get all stuffs that relate to Azure centralized in a project, abstract it behind some sort of interface.  This could be a nice thing to have.  Added benefit is that you can, in theory, abstract out all Azure dependencies in that particular project and deal with a higher level abstraction that will give you an agnostic way to access cloud related stuffs… perhaps this is useful as well if you want to move your cloud dependencies to other cloud vendor such as AWS.
  2. Bite the bullet on the technical debt and manually re-reference the Azure DLL that are skipped by the upgrade tool.  Perhaps figure out a way to automate this as well…
  3. Hope that Microsoft to fix their Azure SDK upgrade tool in Visual Studio to crawl Azure dependencies from the entry points and upgrade those references as well.


What We Did

What we did at work was to go with option 2.  We manually updated Azure .Net SDK references in Cloud Library and Data Access components to be on par with what is in the tool updated web projects.  It would be nice if the tool that comes with the SDK do this automatically... wishful thinking.

We also toyed around with the idea of pulling the Azure DLL dependencies via nuget package and script them somehow, so the next time around we need to upgrade the Azure SDK, we just do a minor change in the PowerShell script and run it which will cause it to update all the Azure DLL references to the new SDK level.


Official Azure Nuget Packages Inconsistencies

Some other weird thing that we found… It’s not very clear which way we should go since half of the Azure DLL can found (officially) as nuget packages such as Storage and Cache, but some others like Service Runtime are referred from the ref folder inside the SDK installation and do not have any official nuget package associated with it.  We did find unofficial nuget package for it though such as Unofficial.Microsoft.WindowsAzure.Diagnostics.

0 Comments

Not too long ago, we moved our repository to www.visualstudio.com

Some reasons behind the moves were:

  1. Visual Studio online repository is free for up to 5 developers (which suit our small team).
  2. We want to take advantage of the continuous delivery workflow that Azure and VS online offer.
  3. VS online has a nice Scrum portal that include feature, backlog and task management, drag-able Kanban board, burn down chart and cumulative flow diagram. The “virtual” project chat room is nice but we use Skype mostly to communicate with our remote team.

Since then, we’ve been working toward enabling continuous deployment on our Azure solution similar to what is described in this article: Continuous delivery to Azure using Visual Studio Online

The purpose of this post is not to teach you how to do this.  For that, please follow the steps described in the linked article above.  What I wish to talk about here is more about what’s missing from the “happy day” scenario of doing continuous delivery as described in that article.

Azure Continuous Deployment of Visual Studio solution with multiple cloud service projects from Visual Studio Online

Caveat: I am an the accidental build master who does not have in depth knowledge of VS Build Process Template customization, not yet anyhow, so the solution described here might not be the most technically correct, but it works for us.  If you know a better way to do this, by all mean, please share.

Originally, our Visual Studio solution contains multiple cloud service projects which we found to not work with the normal continuous deployment scenario that comes out of the box with Visual Studio Online and Azure. 


Why out of the box build process will not work with Visual Studio solutions with multiple cloud service projects

Apparently, the standard continuous deployment workflow that comes out of the box prefers a solution with only a single cloud service project. You can see this in the build definition in the following section: Process/6.Deployment/Deployment/Windows Azure Deployment Environment. Basically, you can only deploy a single cloud service if you doing it the standard way. You might be able to tweak the build definition workflow but we decided to not waste too much time researching this. 


Move each cloud service project into their own Visual Studio solutions

So, we moved the extra cloud service projects from our main Visual Studio solution into their own Visual Studio solutions and re-establish any project / binary references as necessary.  This, however, present a different challenge when doing .NET Azure SDK upgrade, which I will talk about in a different post.  Each of these solutions are then associated with their own continuous delivery build definitions.  We found this setup to be working quite nicely.

Original VS solution:

My Awesome  VS Solution

  • Cloud Service Project 1 (i.e. main web + worker role that will always need to be deployed as pair)
  • Cloud Service Project 2 (i.e. incoming email handler worker role, unfrequently deployed)
  • Supporting library project 1 (i.e. Azure specific library)
  • Supporting library project 2 (i.e. SQL Data Access library)
  • Actual web project
  • Worker role project
  • Email worker project

Refactored VS solutions:

Main Web + Worker Role VS solution

  • Cloud Service Project 1 (main web + worker role)
  • Supporting library project 1
  • Supporting library project 2
  • Web project
  • Worker role project

Email Handler VS solution

  • Cloud Service Project 2 (email handler)
  • Supporting library project 1
  • Supporting library project 2
  • Email worker project

Additional Build Definition Configuration

The build definition themselves need to be tweaked due to the following reasons:

  1. We have multiple cloud service project configuration: development (local). staging, production, etc.
  2. We have multiple build configuration: debug, staging, production, etc.  We use build configuration to include or exclude a certain code path using #if, #endif directive, etc., as well to do configuration transform on web.config or app.config (using SlowCheetah Visual Studio extension).

Therefore, we need to do extra build definition customization in the following sections:

  • Process/Build/Projects: this need to point to the Visual Studio solution you wish to build (must only contain a single cloud service project).
  • Process/Build/Configuration: this need to be configured to match the build configuration and platform that you are building for (i.e. Mixed Platform|Staging or Any CPU|Production).
  • Process/Build/Advanced/MSBuild Arguments: you need to add /p:TargetProfile={your cloud project configuration setting target}, for example: /p:TargetProfile=Production if you are building for Production deployment where each configuration setting comes from the ServiceConfiguration.Production.cscfg file in the Cloud Service project.
  • Process/Deployment/Deployment/Windows Azure Deployment Environment: you need to tweak this to suit your need.  For example what Storage Account you wish the continuous deployment to use (It will upload the built package to the blob storage in the vsdeploy container), whether you wish it to go directly to Production slot or keep it in Staging slot for manual VIP swap, the Azure subscription, which cloud service to deploy to, etc.

I hope this post will help you if you ever found yourself in similar situation.


Further notes on Visual Studio solution splitting

The following has nothing to do with continuous deployment but we realized something else after having tons of issue with Azure .Net SDK upgrade and the way we split up our original VS solution (the one with multiple cloud service projects) into multiple VS solutions. 

The problem originated with how we structure our solution, how the Azure .NET SDK upgrade tool and nuget works. We are using project dependencies and not binary dependencies for our own VS projects when establishing references between projects in the solution.  We also have Azure DLLs (pulled via nuget package) referenced in multiple projects (not just the web project).  And for some reasons, when we update a nuget package such as WindowsAzure.Storage in one of the refactored VS solutions, things will start breaking in the other refactored VS solution, vice versa (build failure, etc.).  This has to do with how the reference dependencies is resolved by Visual Studio.  When shared supporting project 1 is updated (via nuget) in VS solution 1, it will inject the path relative to that particular solution.  When the same supporting project 1 is loaded in VS solution 2, it won’t be able to find the referred DLL in the specific package folder and it will fall back to an older Azure DLL in the C:\Program Files\Microsoft SDKs\Windows Azure\…\ref folder.

So, to solve this issue, we thing the following setup should work nicely.

Say you have 3 cloud services in your product.  You would create the following VS solutions:

  1. A solution which sole purpose is for development only.  This solution can have multiple cloud service projects inside of it (as per original).  The purpose here is to minimize Azure DLLs and other nuget packages issues when upgrading Azure .Net SDK in the future.  Any Azure .Net SDK and related nuget package upgrade should be done in this solution. 
  2. Solution 1 that only contains cloud service project 1 and all other dependencies (i.e. cloud library, data access, etc.).  This will be the designated build solution when deploying cloud service 1.  You should not perform any nuget upgrade in this solution.  As a matter of fact, you should not load this in Visual Studio to do any code alteration.  This solution is purely for build and continuous deployment purposes. 
  3. Solution 2 that only contains cloud service project 2 and all other dependencies (i.e. cloud library only).  This will be the designated build solution when deploying cloud service 2.  You should not perform any nuget upgrade in this solution.  As a matter of fact, you should not load this in Visual Studio to do any code alteration.  This solution is purely for build and continuous deployment purposes.
  4. Solution 3 for deploying cloud service 3… You should not perform any nuget upgrade in this solution.  As a matter of fact, you should not load this in Visual Studio to do any code alteration.  This solution is purely for build and continuous deployment purposes.

I think you get the idea.

We think having multiple solutions like so will simplify both Continuous Delivery and Azure SDK updates in the future.

0 Comments

Problem origin:

Installed a new Azure development platform using Win7, VS2010, SQL 2012 Express.  Installed latest Azure tools, and stopped .NET 4.5 installation midway...

Loaded the Azure project in VS, tried debugging. Debugger wouldn't attach.

Ran without debugger, browser loaded and ... 403.  WTF

Messed around with IIS settings and permission from Management console... didn't work.

Bang head on wall... look around some more... found this...

http://stackoverflow.com/questions/9472490/windows-azure-cant-start-locally

aspnet_regiis -I to the rescue...

Everything started working again :).