0 Comments

Problem origin:

Installed a new Azure development platform using Win7, VS2010, SQL 2012 Express.  Installed latest Azure tools, and stopped .NET 4.5 installation midway...

Loaded the Azure project in VS, tried debugging. Debugger wouldn't attach.

Ran without debugger, browser loaded and ... 403.  WTF

Messed around with IIS settings and permission from Management console... didn't work.

Bang head on wall... look around some more... found this...

http://stackoverflow.com/questions/9472490/windows-azure-cant-start-locally

aspnet_regiis -I to the rescue...

Everything started working again :).

0 Comments

After getting my feet wet doing BizTalk development for about a year now, I found the following free tools quite useful during development / support lifecycle (Not necessarily in order of importance).

1. Fiddler

Very very useful to be able to monitor web traffic especially when integrating with WCF / Web Service endpoint.  Also useful when trying to figure out what’s going across the wire when prototyping web service call using a 3rd party web service API i.e. HP Trim, IBM Maximo, SunSystems Connect, etc.  Found it helpful when trying to determine the correct SOAP Action to bind to the port as well.  Used it to debug / monitor messages flying across the wire after deployment (act as a proxy to BizTalk web service / WCF endpoints).

2. SoapUI

Got introduced to this tool in the last couple projects.  Basically Fiddler can play this role as well, but I’ve found myself using this to create and save sample SOAP calls and see what’s coming back from web service call without having to manually intercept messages coming and going across the wire ala Fiddler.  If you know what message you want to send across and the endpoint it needs to go to, you can fake outgoing message from one system and send it directly to the next endpoint.  Found it quite useful when the source system is not quite ready yet to be integrated while you have to test the next part of the integration or the inbound system is unable to communicate to BizTalk for whatever reason in a support / testing scenario.

3. DanSharp XmlViewer

Quick way to get the right xpath given a sample XML file.  Otherwise you have to go through the XML schema in Visual Studio to figure this out.  Just load the sample XML, click on the node / attribute you are interested in and ouila, instant xpath.  You can test xpath modification as well to see what result you are going to get.  It has saved me a lot of headache trying to debug xml namespacing issue.

4. xsltcake

Awesome, I repeat… AWESOME, online tool to create and test XSL transformation ala jsfiddle / jsbin (similar tools for quick prototyping JavaScript and sharing them to the masses).  It even can do Microsoft inline scripting using inline C#, VB, etc. when you set the processor to .NET.  This has become my favorite free tool when I have to do custom XSLT mapping.

5. Windows Sysinternals DebugView

What can I say… this is just another awesome tool.  One thing that is a pain to do in BizTalk solution is debugging it, so put a lot.. I mean A LOT of System.Diagnostics.Trace (TraceInfo / TraceError) statements in your expression shapes in the orchestration / custom components and see it light up inside DebugView to see what’s actually going on in your BizTalk application.  LIFESAVER in UAT / production environment!!

6. find (Windows built in command line tool)

Hmm… couldn’t find the technet / msdn article on this, but…  This is a tool that you can use to quickly figure out if a particular message goes through a BizTalk “debug/audit” ports.  Trick is to actually save the messages you wish to audit (just subscribe to the port or build it into your orchestration).  Hook it up to File Receive Location and when you need to find a particular message having a certain text in it, fire up command prompt, go to the directory where you store your audit files and launch this. I.e. find /N “<InvoiceID>12934</InvoiceId>” *.xml | more.

There you have it…  Did I mention they are all free?  So… just use them and enjoy.

0 Comments

You probably already know that you can boot off VHD from Windows 7.  If you don't, it's about time you learn it.  It's a very neat feature.

You also probably seen blog posts on how to install and boot Windows 8 from VHD (such as this one from @hanselman).

As everyone else that doesn't actually have tons of machines lying around to try Windows 8 and does not want to lose the current OS installation, you probably been playing around with Windows 8 in a virtualized environment such as VirtualBox.  And if you do,you probably know that you can have a virtual hard drive in VHD format when you create your virtual machine.

Hmm...

  • so, Windows 7 can boot VHD...
  • and VirtualBox can create VHD...
  • and I already have a Windows 8 virtual machine that is stored in VHD format in VirtualBox.

Hey!! Why don't I just boot it up from THAT??!! Big Smile

Well, ... of course you can!

But... what the heck for... you can just create VHD in Windows 7 using diskpart utility and mount it and burn Win8 iso to USB stick and make it bootable (if you can find a large enough one around) or a bootable DVD (who the heck does this nowadays?).

See..

  • I have VirtualBox already (I did mentioned this, right?). 
  • It's easy enough to create VHD and install Win8 (doesn't matter if it is developer or consumer or release preview or ...) from the ISO in VirtualBox. (I always use VHD format since it is portable between multiple VM platforms anyway.)
  • It's probably the first thing that you would do anyway when wanting to try the new and shiny things in any OS (install it in a virtual platform and play around with it).
  • Now that I've done all this... why not reuse the VHD?  No reason not to.

But... what happen to all my device configurations? See... in VirtualBox, my network driver, my sound driver, my display driver, etc. are bound to specific virtualized drivers.  If I boot from that VHD wouldn't Windows 8 be screwed up?

Well, from what I have running so far, it doesn't seem to be.  The first time it booted from the VHD, it looks like Windows 8 reconfigures the devices anyway so when I am booted up, I see my real hardware from the Device Manager.  So, no worry there.

Neat... so... what do I do know if I want to do this?

You only need 3 steps.

Step 1.  Detach the VHD from VirtualBox and remove it and release it from VirtualBox Virtual Media Manager.

(You might not need to do this, but this is what I did just to prevent unwanted side effects, just in case).

Remove and release... hmm.. how the heck do I that?

Sigh... Select the Windows 8 VM from inside VirtualBox Manager, bring up the Settings for it, then on Storage, select the VHD from the attached controller, and click the Remove Attachment icon at the bottom of the Storage Tree pane to remove the VHD.

To release the media from VirtualBox, open the Virtual Media Manager by going back to VirtualBox Manager, click Ctrl-D or choose File, Virtual Media Manager from the menu.  From the Hard Disks tab, choose the Windows 8 VHD and click the Release icon near the top.

Step 2. Mount the VHD natively in Windows 7 using Disk Manager and mark it active.

... Don't know how to this too?... Fine...

Open up Computer Management by typing this cryptic string into your Start menu search bar: diskmgmt.msc and press Enter.

Click the Action menu, and choose Attach VHD and choose the Windows 8 VHD that you just released from step 1. DO NOT make it Read only!

(I might be wrong here, but I've read this somewhere and it worked for me.  You might not need to do the following....)

After you've done this, you should see the VHD as a disk in the center lower pane.  I think Windows will also assign specific drive letter to it.  You might have 2 partitions off the same virtual disk... now, this is the tricky part... you need to mark the one w/ the new Windows 8 OS active.  You can do this by judging the size of the partition or a safer way is to browse your new drives and see which one it is.  It should have a Windows folder from the root drive when you open it in Explorer.  Say... you have 2 more new drives after you mount the VHD, say drive D and drive E.  Browse those drives and see which one has Windows directory.  That's the one you want to make active.

To mark the partition as active, just right click on it from the Disk Management lower center pane and choose Mark partition as Active.

But... but... I want to see nice pretty pictures of what I should click...

Bah... no pretty picture for you... I am too lazy to do screen capture this early in the morning, hahaha.  Figure it out.  Frankly, if you don't know how to do this, you shouldn't be doing this anyway.  You might screw up your machine and cry like a baby afterward. Big Smile

Bah... I am l33t enough, I want to do this using diskpart!!

You silly, silly person... why choose command line when there is a simple GUI for it... sigh.  Do what you wish.  There should be enough blog posts out there to explain this.  @hanselman post above is a good starting point.

Step 3. Add boot entry to the boot loader using bcdboot.

OK... remember what drive you seen the Windows installation before in step 2?  You need to add that to the boot loader.

Getting too lazy to explain, hehehe.  Uhm... just follow the section called Add a Mapped VHD to Your Boot Menu in this blog post.

There... done.  Now you can reboot your machine, the new graphical boot loader should comes up and will let you boot Windows 8 from the attached VHD.  It will take a while the first time you boot into Windows 8 since it will try to reconfigure all the new found hardware.

Enjoy your new shiny, fast and fluid thing.

Speaking about fast... People in the podcasts I listen to keep saying WOW, look how fast Win8 boot up... uhm... how come I don't see that.   Maybe they are too freaking rich and have SSD for their boot drive... or is it the VHD thing that's making it slow... shrug.  Still take a bit of time for me to boot up Win8 from my spinning metal of death 500 gig laptop hard drive.  Frankly my Win7 installation boot faster but... whatever.  LOL.

0 Comments

The Problem

While playing around with SharePoint web service from Silverlight out of browser, I bumped into web service proxy limitation where I am forced to authenticate no matter what I pass to the ClientCredential.UserName property of the web service client proxy.

//This does not work... will get authentication prompt
var request = HttpWebRequest.Create(uri);
request.ClientCredential.UserName.UserName = "DOMAIN\\user1";
request.ClientCredential.UserName.Password = "password"; 

The Authentication Problem Workaround

Luckily, starting from Silverlight 3 up, you can use the ClientHttp object that allows passing specific credential for the web request.

//This now work wonderfully from Out of Browser Silverlight 3 or up
var request = WebRequestCreator.ClientHttp.Create(new Uri("http://localhost/_vti_bin/lists.asmx", UriKind.Absolute));

//This is required, or otherwise you will be prompted for authentication
//It basically said, no don't use the current login, I'll tell you what login to use later.
request.UseDefaultCredential = false

//Pass your credential here...
request.Credentials = new NetworkCredential("user1", "password", "DOMAIN");

Ouila! Authentication problem solved.  Bye bye authentication prompt.  See you later... or not.

What About My Web Service?

Now... for the second problem, without the nicely generated web service proxy, how the heck am I going to call my web service method?

Well, luckily, SharePoint and other web service for that matter, give you a neat example of what to pass in a SOAP message like so:

if you put something like http://localhost/_vti_bin/lists.asmx into your browser Address (URL) field, you'll get this:
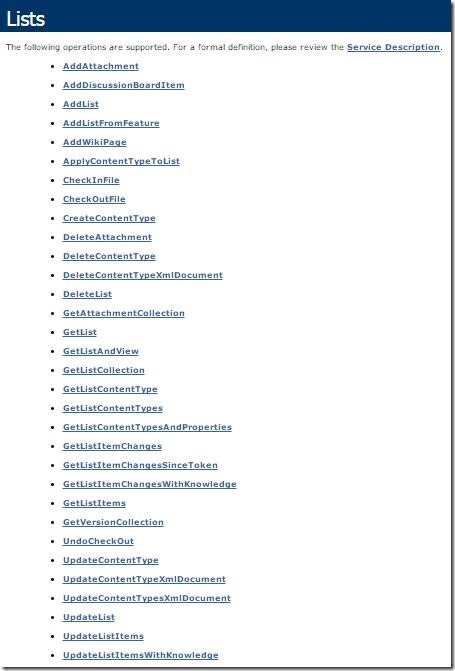
Sharepoint_WebService_EndPoint

In this case, I am interested in adding a list item to one of my SharePoint list.  The method (SOAP action) for this is UpdateListItems.  If you don't believe me, see this.

So if you click the UpdateListItems from the nice list above, you'll get this:
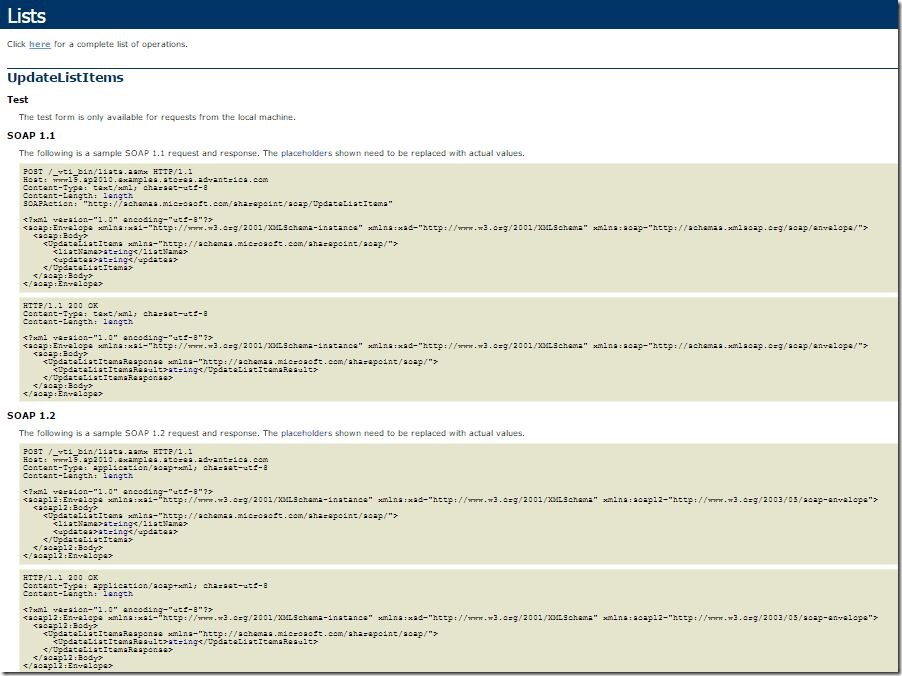
Sharepoint_WebService_UpdateListItems

See that SOAP message example (in particular the top one which is a SOAP 1.1 request message)?
Yeah it's a bit ugly, but trust me underneath the nicely generated web service proxy that you usually get when adding a service reference, you'll see this message somewhere in there if you open up the generated proxy client code in one shape or form. 

<digress>Actually if you look inside the generated proxy inside Reflector or similar tool like ILSpy for those who don't want to pay for Reflector, you'll see the serializable form of this as class and class members which later on will be serialized into
the XML format that you see above. </digress>

Well, like it or not, you will need to create your own web service wrapper around the SOAP message.  The good thing is... it's not that hard.

Below is a bit of code that I whipped out and refactored in about 2 hours to do this (for now only the UpdateListItems is implemented plus the rest of SOAP Web Service infrastructure):

using System;
using System.IO;
using System.Net;
using System.Linq;
using System.Xml.Linq;
using System.Net.Browser;
 
namespace SilverlightApplication9
{
    public class SharePointWebService
    {
        static XNamespace xsi = "http://www.w3.org/2001/XMLSchema-instance";
        static XNamespace xsd = "http://www.w3.org/2001/XMLSchema";
        static XNamespace soap = "http://schemas.xmlsoap.org/soap/envelope/";
        static XNamespace sharepoint = "http://schemas.microsoft.com/sharepoint/soap/";
 
        XElement SoapEnvelopeTemplate;
        Uri WebServiceUri;
        NetworkCredential Credential;
 
        public SharePointWebService(Uri spWebServiceUri, NetworkCredential credential)
        {
            WebServiceUri = spWebServiceUri;
            Credential = credential;
 
            SoapEnvelopeTemplate = new XElement(soap + "Envelope",
            new XAttribute(XNamespace.Xmlns + "xsi", xsi),
            new XAttribute(XNamespace.Xmlns + "xsd", xsd),
            new XAttribute(XNamespace.Xmlns + "soap", soap),
            new XElement(soap + "Body"));
        }
 
        public void UpdateListItemsAsync(string listName, XElement updates, Action<XDocument> callback)
        {
            var message = CreateUpdateListItemsMessage(listName, updates);
 
            SoapActionInvokeAsync(
                "http://schemas.microsoft.com/sharepoint/soap/UpdateListItems",
                message,
                callback);
        }
 
        protected void SoapActionInvokeAsync(string soapAction, XElement soapMessage, Action<XDocument> callback)
        {
            WebRequest request = WebRequestCreator.ClientHttp.Create(WebServiceUri);
 
            if (Credential != null)
            {
                request.UseDefaultCredentials = false;
                request.Credentials = Credential;
            }
 
            request.Headers["SOAPAction"] = "\"" + soapAction + "\"";
            request.ContentType = "text/xml; charset=utf-8";
            request.Method = "POST";
 
            var message = "<?xml version=\"1.0\" encoding=\"utf-8\"?>\n" + soapMessage.ToString();
 
            request.BeginGetRequestStream((ar1) =>
            {
                using (var stream = request.EndGetRequestStream(ar1))
                {
                    using (var writer = new StreamWriter(stream))
                    {
                        writer.Write(message);
                    }
                }
 
                request.BeginGetResponse((ar2) =>
                {
                    XDocument xml = XDocument.Load(
                        request.EndGetResponse(ar2).GetResponseStream());
 
                    callback(xml);
                }, null);
            }, null);
        }
 
        public XElement CreateUpdateListItemsMessage(string listName, XElement updates)
        {
            EnsureSharePointNamespace(updates);
 
            var body = new XElement(sharepoint + "UpdateListItems",
                new XAttribute("xmlns", sharepoint),
                new XElement(sharepoint + "listName", listName),
                new XElement(sharepoint + "updates", updates));
 
            var envelope = XElement.Parse(SoapEnvelopeTemplate.ToString());
            envelope.Descendants(soap + "Body").First().Add(body);
 
            return envelope;
        }
 
        protected XElement EnsureSharePointNamespace(XElement el)
        {
            foreach (var e in el.DescendantsAndSelf())
            {
                e.Name = sharepoint.GetName(e.Name.LocalName);
            }
 
            return el;
        }
    }
}

And here is an example of how to use it from Silverlight:

var ws = new SharePointWebService(
                new Uri("https://localhost/_vti_bin/lists.asmx", UriKind.Absolute),
                new NetworkCredential("user1", "password", "DOMAIN"));
 
            ws.UpdateListItemsAsync("jtest",
                XElement.Parse(@"<Batch><Method ID=""1"" Cmd=""New""><Field Name=""Title"">New item</Field></Method></Batch>"),
                (doc) =>
                {
                    Dispatcher.BeginInvoke(() =>
                    {
                        textBox1.Text = doc.ToString();
                    });
                });

This has been a pretty fun exercise... It would be better if the proxy ClientCredential code can do similar thing, but well... live sucks and that's why you are a coder, right?  

<digress>Some of you might be thinking what the hell the relation between live sucks and being a coder.... Don't worry, I don't know either, LOL.  Guess that's why this blog is called Incoherent Rambling... </digress>

0 Comments

While playing around with SharePoint 2010, I want to add a link to my site home page that will do the same thing when I am in a particular document / form library and click the Add Document link. 

In other word, how can I launch Word or Excel or InfoPath from my own link without having to go inside the library and clicking Add Document?

At first, I couldn't figure out how to do this.  Decided to dive into the HTML source of the Form Library AllItems.aspx view and found a CoreInvoke JS method, like:

CoreInvoke(
    'createNewDocumentWithProgIDEx', 
    'template source URI', 
    event, 
    'save location URI', 
    'SharePoint.OpenXMLDocuments', 
    true); 

I plop that inside a link tag and it worked. 

After the fact, I look around the web and finally found someone else that has done this already...

See: http://www.sharepointkings.com/2010/02/create-new-document-link-in-listview.html

The syntax is something like:

createNewDocumentWithProgID(templateSourceURI, saveLocation, docType, false);

In my case, I want to launch an InfoPath form template, and I found the following work just fine:

createNewDocumentWithProgID(
    'http://intranet/spike/FormLib1/Forms/template.xml', 
    'http://intranet/spike/FormLib1', 
    'SharePoint.OpenXMLDocuments', 
    false);